The integration with Entra ID allows you to load users from Active Directory into HotH and to also send/reading emails from a M365 account or shared mailbox. To get up and running with the email side of things, you need to add a new Application Registration in Entra ID.
Prerequisites
1. A user account with an Exchange Online license. You can choose one of the following options:
a) Add a new (non-admin) user (e.g. HotH email) and assign a basic M365 license including Exchange Online. Then add the User as a Member (delegate) on the Shared Mailbox with Send As permission, or;
b) License the user associated with the Shared Mailbox (this user is automatically created when you create a Shared Mailbox). You can do this in M365 Admin Center – go to Users, Active Users and find the account corresponding to the shared mailbox. The user is automatically created when you create a shared mailbox. Select the User and click on Licenses and Apps tab. Add a M365 license (requires Exchange Online). If you do not select a suitable license, you’ll see an error message in the next step telling you the user doesn’t have an Exchange Online license. Click Save changes. Click the back arrow. You can click on the Reset password button at the top to create a password for the account (you will need this later to authenticate HotH). Close the user properties. If you choose this option, you do not need to add the user as a member on the shared mailbox.
2. The user needs Authenticated SMTP enabled, as well as IMAP and/or Pop protocol (for Email Read). You can do this in M365 Admin Center, Active Users, open the user account details for the selected user and click on the Mail tab. Click on Manage email apps. Make sure that Authenticated SMTP is ticked. Also ensure IMAP and/or Pop is ticked – depending on which email receiving protocol you wish to use with HotH. Pop is the most widely used. Click Save changes.
Once the prerequisites have been fulfilled you can continue to the next section.
Add an Application Registration in Entra ID
- Navigate to the Microsoft Entra ID section of the Azure Portal.
- In the App Registrations section, click to add a New Registration:

- Give it a name – e.g. HotH email integration.
- Under Supported Account Types, select Accounts in this organizational directory only.
- Under Redirect URI (optional) – Select Web in the first dropdown and enter your HotH system URL – ask HotH if you’re unsure what this is.
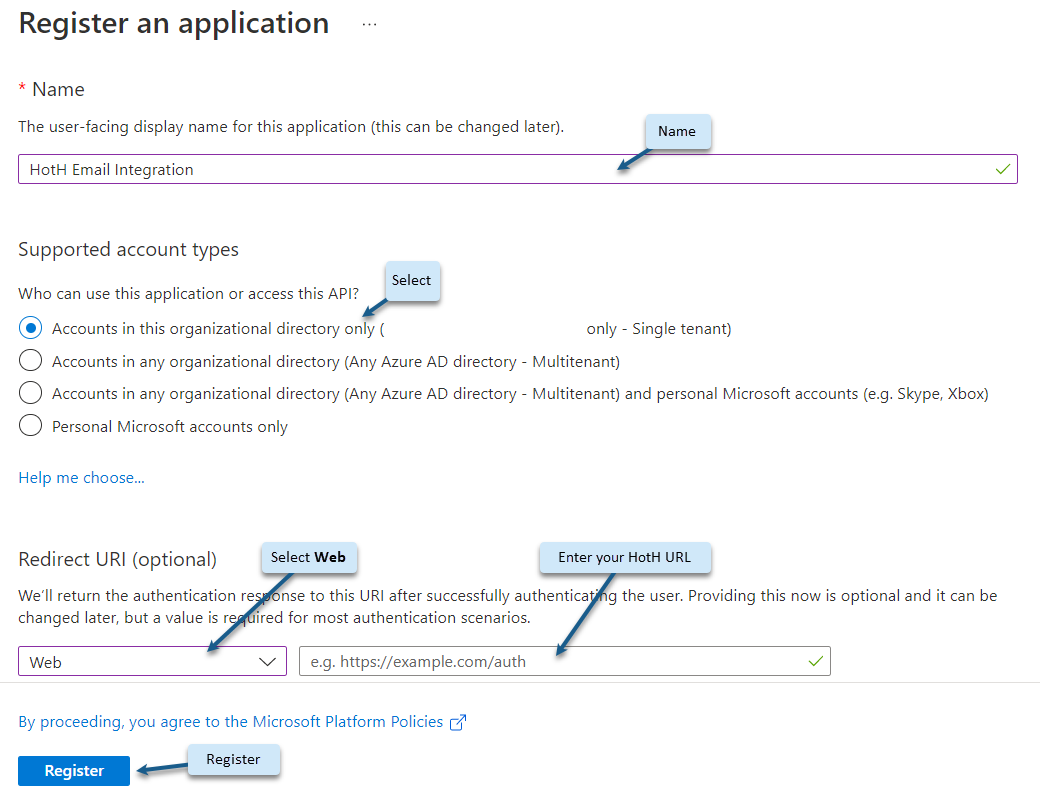
- Click Register to then be presented with an Overview page:
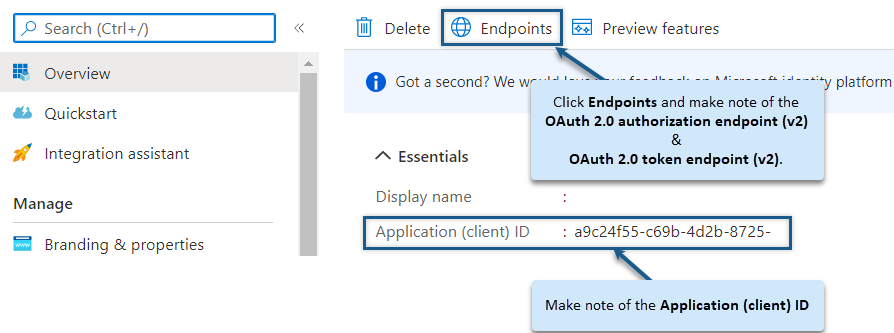
- Make a note of the following for later use (or send to HotH if you want help completing
the setup):
o Application (client) ID.
o Click on the Endpoints tab and copy the top two entries:
OAuth 2.0 authorization endpoint (v2)
OAuth 2.0 token endpoint (v2) - Click the Certificates & secrets link on the left hand side.
- Click + New client secret in the Client secrets section:
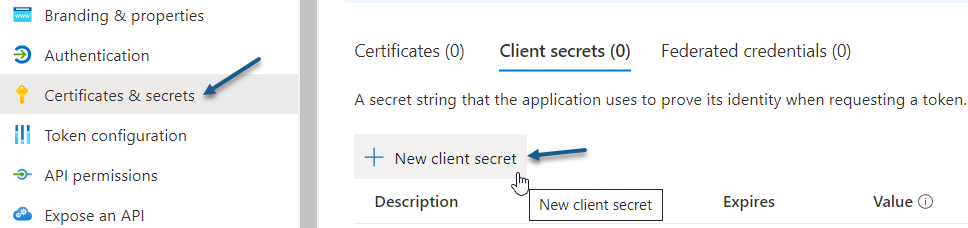
- Set Expires to 24 months and click Add (you don’t need to give it a Description).
- Copy the Value (not the Secret ID) of the newly generated Secret. **You won’t be able to see it
again**:

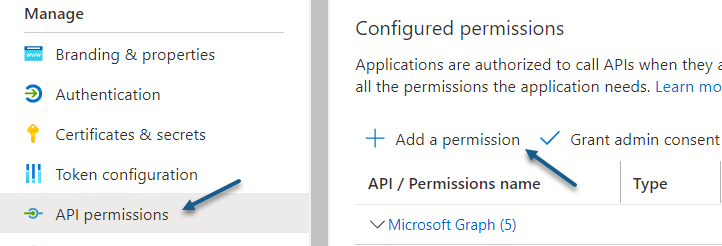
- Click on API Permissions link on the left hand side.
- Click + Add a permission
- On the Microsoft APIs tab, click on Microsoft Graph, then Delegated permissions.
- Tick the following options:
o offline_access (under OpenId permissions section)
o POP.AccessAsUser.All (under POP section)
o SMTP.Send (under SMTP section)
o Most customers choose to use POP protocol for HotH to monitor a mailbox. However, if IMAP protocol is preferred, then ignore the POP line above and add the IMAP scope instead: IMAP.AccessAsUser.All (under IMAP section). N.B. You should not usually require both POP and IMAP. - Click Add Permissions button at the bottom.
- Configured permissions should have been added:
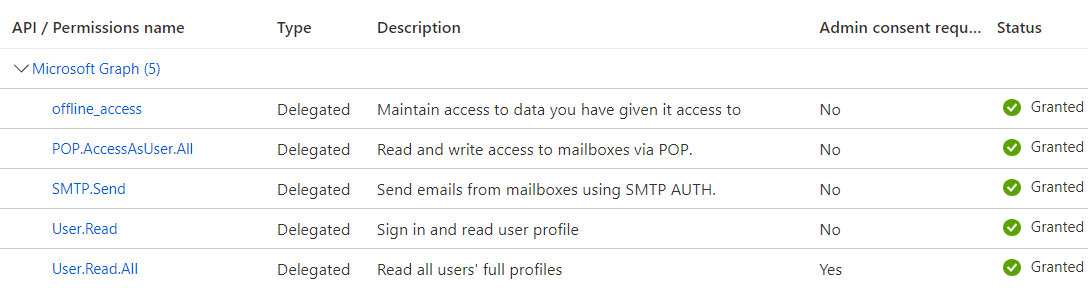
- Click Grant admin consent for … and click Yes on the confirmation popup. The Status field should now read Granted for… against all the permissions.
- Click to view Enterprise applications via the link at the bottom of the API Permissions summary screen.
- If not opened automatically, locate and open the Enterprise Application with the same name as the App Registration you just created.
- Click the Properties menu item.
- Select Assignment Required = Yes (this ensures only the specific end-user can request a token)
- Save
- Click the Users and groups menu item. This is where you’ll add the end-user allowed to use the app.
- Click + Add user/group
- Click on None Selected under Users and groups.
- Click the required end-user (the account which will be used to send/read emails from HotH) and click the Select button.
- Click the Assign button
HotH Configuration and Authentication
- Log in to your HotH hosted system as a Supervisor login on an Incognito/InPrivate browser window (to ensure not logged in to Microsoft).
- Click on the Settings Cog
 and select More Tools, OAuth Scripts
 - Add a new script using the + button, making sure you start the script with the prefix oauth: (e.g. oauth:email). You may wish to use the same name as the App Registration here for simplicity.
- Fill in the following fields with the data noted during the App Registration:
o Application (client) ID
o OAuth 2.0 Auth Endpoint (v2)
o OAuth 2.0 Token Endpoint (v2)
o Client Secret - Enter the URL of your HotH hosted site in the Redirect URI field.
- In the Authorization Scope field, copy and paste the following text to auth HotH for POP and SMTP access (amend accordingly if IMAP is preferred):
offline_access https://outlook.office.com/POP.AccessAsUser.All https://outlook.office.com/SMTP.Send - Click Save
- Click Auth
- You will now be redirected to a Microsoft Login page – log in using the end-user account you wish to use for sending/reading in HotH emails. It is important to log in as the correct user here.
- You should then be redirected back to the HotH OAuth script (now showing an Authorization token). Setup is complete. OK the script.
- If authorisation fails, try opening a new tab in the browser and browse to any M365 service page. Log out of Microsoft as yourself. Click back to your HotH tab and click the Auth button again. You should now be redirected to a Microsoft login page where you can log in using the account to be used for HotH emails.
HotH Email Setup
Your HotH email setup may differ from the notes below. Please ask HotH for assistance if you are unsure about any of the following settings. HotH email setup is usually completed by HotH Professional Services but is noted here for general information.
Outbound Email:
- To configure HotH to use the new OAuth script for outbound emails, click on the cog icon (top right) and select Email Settings.
- Click Outbound Email Settings at the top, click the Modify button, and complete the fields:
o SMTP Server = smtps:smtp.office365.com:587
o SMTP Account = the user account you configured at the beginning of these instructions
o SMTP Password = the name of the HotH OAuth script you just created, prefixed with oauth: (e.g. oauth:email). - Click OK
- Ensure that the From address on the HotH email templates matches the email address of the Shared Mailbox.
- Outbound email should now work.
- HotH systems with multiple folders (requiring different emails addresses) will complete their email configuration at the Folder level instead.
Inbound Email:
- Please contact HotH for assistance with the automatic creation of new tickets from incoming emails.
Still haven’t found what you’re looking for? Contact documentation@houseonthehill.com


