Inbound emails that are updates to existing tickets are added as Notes. Other emails are selectively added, filtering out unwanted or inappropriate messages.
Click the links below to learn more information:
- Inbound Email Connection
- Inbound Email Login
- Matching Email Domains
- Controlling Populated Fields
- The Mail Room
- Email Form Templates
- Linking Incoming Emails to QuickCalls
- Read about Folders
- The Mail Service
Inbound Email
HotH can be configured to read mail from mailboxes and convert those emails into tickets or added as Notes to existing tickets.
Navigate to the Settings Cog ![]() > Email Settings to view the email template summary:
> Email Settings to view the email template summary:

Connection
Click the Inbound Email Settings link to view the Mailroom Setup:

Inbound Email login
The Email read process needs a Login record that has the box Server E-mail Login checked on the Options tab. This doesn’t take up one of your user licenses.

Matching Email Domains
HotH tries to match the incoming email address with the email addresses on Customer and Contact records. If a match is found, the details will be populated in the ticket. If no direct match can be made and if the option ‘Match on customers Domain’ is ticked, HotH will look for the first Customer/Contact that has a matching email domain and assign the ticket based on this information. This feature can be useful when HotH is being used to support external customers and ‘unknown’ contacts from one of the customers may send in emails.
The incoming email is saved on a note. So, if the address cannot be reconciled, it can be found on the Note.
Controlling Field Population
The following options are available for loading the email subject and email body:
- 1 – Email:Subject -> Ticket:Subject ; Email:Body -> First Note on the Ticket
- 2 – Email:Subject AND Email:Body -> Ticket:Subject; Email:Subject->Ticket:Summary
- 3 – Email:Subject -> Ticket:Summary ; Email:Body to Ticket:Subject
- 4 – Email:Subject -> Ticket:Summary ; Email:Body -> Ticket:First Note
- 5 – Email:Subject -> Ticket:Summary AND Ticket:Subject ; Email:Body -> Ticket:First Note
Option 2 is the default, please Contact House-on-the-Hill to change your settings.
Manual Mail Read – The Mailroom
The Mailroom is located in Messages in the side menu:

The Mailroom is a feature that allows the system to interrogate a single, specified mailbox, display the emails in it, and then create tickets from selected emails.
It is available to helpdesk agents to interrogate the mailroom mailbox that has been setup for the system.

Click on the mail that you want to add as a ticket; A summary is shown.


After HotH has read in the mail it is deleted; consequently, when the view of emails is refreshed this email will no longer show.
The ticket will be logged within HotH following with the normal lookup employed to match the sender’s address with a Customer/User in the system.
If the mail that is read in has a subject with the configured separator and a valid ticket reference,
e.g. Incident Reference/IM000352 I need some help…
then HotH will automatically search for a ticket with this reference and add the mail as a note to that ticket.
The Mailroom is a useful way of testing what happens when you read in selected mail. You can then make sure that you establish rules so that the Automatic Mail Read service works for you.
Email Read Form Templates
Are used to control which emails are converted into tickets.
Under the Settings Cog![]() >Email Settings, look at Template Type – Email Read Forms
>Email Settings, look at Template Type – Email Read Forms
- Email with subjects that match the subjects on the Email Forms will be converted to tickets.
- If there is an Email Form with a blank subject, all incoming messages will be treated as a new Ticket (with some exceptions described below).
- To read in email and add to an existing ticket as a Note, then the email subject must include:
- A recognised subject (or the text SupportDesk or SuppDesk) and
- The designated Ticket Reference delimiter (default is forward slash (/)) followed immediately by the Ticket Reference
- The Ticket must exist in live tickets
- You can change this Ticket Reference delimiter. For Hosted systems, Contact House-on-the-Hill. For on-site systems this is in the suppdesk.ini file located on the PC where the mail is being read in; amend the entry “RefSeparator=/” to be what is required.
- To IGNORE emails, you create Email Read Forms with the subject IGNORE ***. All mails containing the Subject *** are ignored by the mail read process; for example, you might use this to IGNORE Out of Office messages
- The IGNORE string can contain more than one word
- You can have multiple IGNORE forms
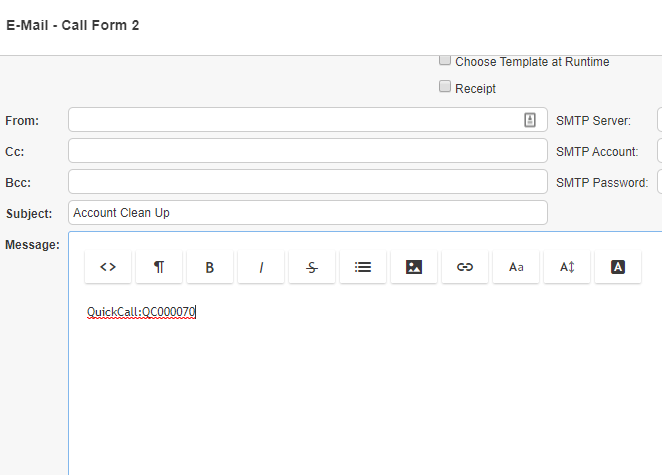
Linking Incoming Emails to QuickCalls
HotH still needs to generate a ticket by using a template that matches the subject of the incoming email (in this case the email and template subject both contain the string ‘Account Clean Up’).
In addition, the body of the email template contains a variable to link it to the appropriate QuickCall; e.g. QuickCall:QC000070.
The field entries on the QuickCall are used to populate the new ticket, in the same manner as when using the QuickCall manually.
Folders
If you have multiple folders and you want to read mail into a specific folder, then start your incoming message with the phrase Folder=Folder Name or you can use Folder: Folder Name.
If you have multiple mailboxes, then you can set the system to read in the email to a different folder, one per mailbox. In this case, the POP3 account settings are maintained on the Folder Settings Cog ![]() >Folders.
>Folders.
When the mail read process is running, each mailbox will be checked in turn.
Automatic Email Read – The Email Service
If you have a hosted system, then Contact House-on-the-Hill to set this up for you.
If you have an on-site system then you need to refer to these instructions.
Diagnosing Issues with Inbound Mail
The HotH Email read process writes a simple text file into the installation directory each time it checks for emails. This file is called mailread.txt and can be useful in diagnosing issues. If you have a hosted system, we routinely check this for you.
Still haven’t found what you’re looking for? Contact documentation@houseonthehill.com


