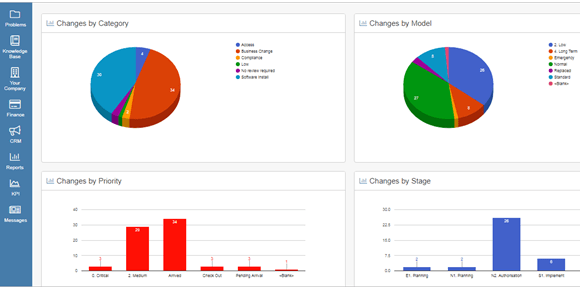
House-on-the-Hill allows users to have their own individual view upon logging in, and can be a good way of creating personalised dashboards for your Customers, including adding company logos, colours and text.
Dashboard Forms provide the functionality for you to alter the “landing” screen for users, whether it’s Service Desk Agents that are logging tickets or your end-users. This means that, upon logging in, each user could have a unique screen that has been associated with their login record.
Click the links below to learn more information:
- Dashboard Form Overview
- Dashboard Form Creation
- Additional Tabs
- Activating Dashboard Forms
- Dashboard Component Forms
- Special Forms within Dashboards
Dashboard Forms Overview
Dashboards can also be associated to roles. An example of a Supervisor login Dashboard is shown below:
Dashboard Form Creation
Prior to creating the Form there should be some planning to decide how the Dashboard should look and function and who is going to see the Dashboard upon logging in. It is also a good idea to familiarise yourself with the privilege rights of Login types so that you can identify what customers will be able to do and see.
The Dashboard Designer is accessed by Supervisors via the Settings Cog ![]() > Forms & Dashboards > Dashboards:
> Forms & Dashboards > Dashboards:

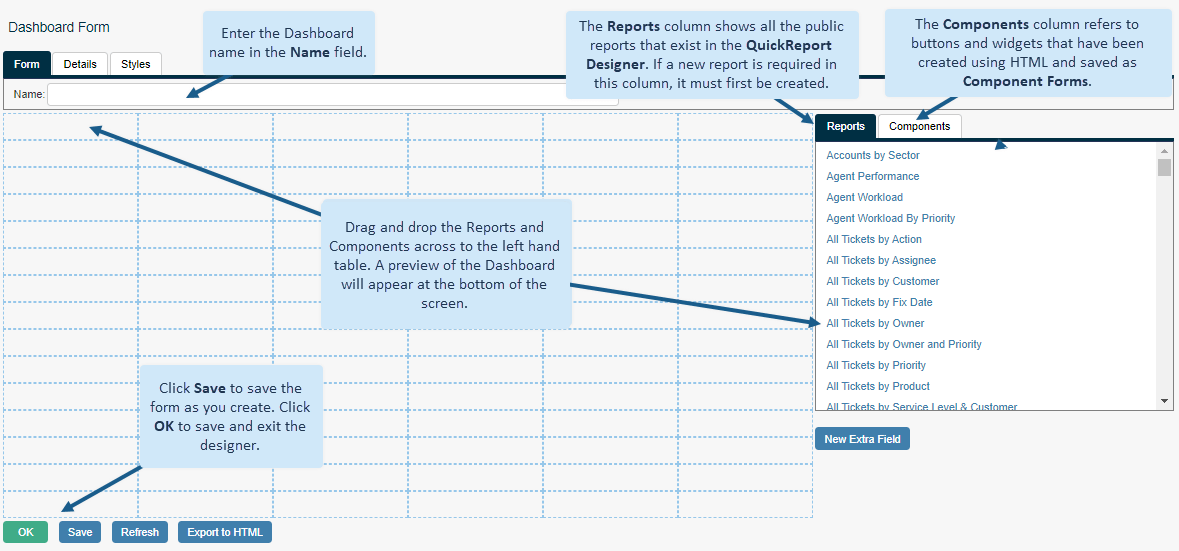
To create a new Dashboard, click the Add ![]() button to open the Form Designer screen:
button to open the Form Designer screen:
In order to begin building a new Dashboard, make selections from the right hand side of the screen, and drag the selection across to the table on the left.
The Dashboard form designer also contains Details and Styles tabs.
Details and Styles Tabs
The Details Tab of the Form allows entry of a Form Description:

The Styles Tab allows direct editing of the HTML Styles controlling the look of the Dashboard Form: 
Activating Dashboard Forms at Folder Level
Once Dashboard forms have been created there are different ways to make use of them. You can set default Dashboards on individual Folders. This means that, when a Folder is accessed by a Service Desk Agent, a completely unique Dashboard can be displayed. This is extremely useful for managers of multiple processes, or of multiple business areas, as it enables detailed, but separate dashboards for each process to be displayed by simply selecting from the Folder drop-down:

In order to set a default Dashboard for each folder, Supervisors can access the Settings Cog ![]() > Folder and pick the required process (e.g. Ticket Management). Then, in the Framework section of the Folder Details screen, select the Dashboard from the Default Dashboard drop-down:
> Folder and pick the required process (e.g. Ticket Management). Then, in the Framework section of the Folder Details screen, select the Dashboard from the Default Dashboard drop-down:
Examples of Process Dashboards:


Activating Dashboards at Individual Login Level
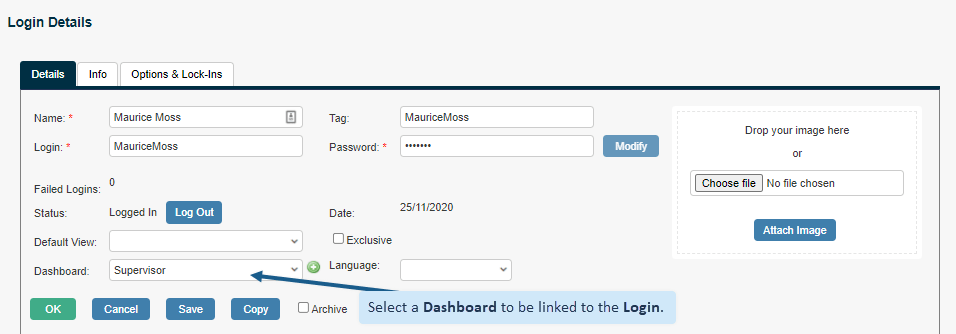
Customers can view their own unique Dashboard upon logging in. Supervisors can set this by going to Settings Cog ![]() > Logins & Teams, and finding the required login. Here, on the Details tab, the Dashboard can be selected and set from the Dashboard drop-down:
> Logins & Teams, and finding the required login. Here, on the Details tab, the Dashboard can be selected and set from the Dashboard drop-down:
Activating Dashboards at Privilege Level
HotH automatically recognises which Dashboard to display to a Customer when they have logged in, based on their privilege level. This is done simply by naming the Dashboard with the same term as the privilege. For example, if there is a universal Dashboard to be used for all Analyst logins, the Dashboard form named Analyst will automatically display for all Analysts logging in (unless there is a Default Dashboard set against an individual’s Login). The Dashboard can be edited from in the Form Designer and will update the Dashboard for all Analysts.

Dashboard Component Forms
Components can be created to be used on the Dashboard, and once created will appear in the right-hand column list on the Drag and Drop designer. These can generate specific ticket forms, QuickTickets, Views, Reports etc.
Numerous Components are shipped as standard, such as specific buttons. It is possible to edit these using HTML, or new Components can be created from scratch. Supervisors can create new Components via the Settings Cog ![]() > Forms & Dashboards, and selecting Component from the Form Type drop-down:
> Forms & Dashboards, and selecting Component from the Form Type drop-down:
Then click the Add ![]() button to create a new Component:
button to create a new Component:

The code shown below is one example of a single button that has been built to summon a QuickCall named “Quick Call 1” when clicked. Wording has been left generic in this example:
<a class=”view-button blue” href='[System:Action]QC&QC=QC000001′>New Thing<span>+</span></a><style>body.right-panel .view-button.blue{
background: lightblue;
border:0 solid #aaa;
border-radius: 5px;
box-shadow:inset 0px 0px white;
float: left;
text-align: center;
text-decoration: none;
line-height: 40px;
padding: 10px;
font-size: 16px;
color:#3a3a3a;
-webkit-transition: 0.2s ease-out;
-moz-transition: 0.2s ease-out;
-o-transition: 0.2s ease-out;
-webkit-box-sizing: border-box; /* Safari/Chrome, other WebKit */
-moz-box-sizing: border-box; /* Firefox, other Gecko */
box-sizing: border-box; /* Opera/IE 8+ */
opacity: 1;
height:100px;
width:100%;
}
.view-button:hover span{
opacity: 0.8;
}
.view-button.green span{
width: 100%;
float: left;
font-size: 50px;
font-weight: bold;
color:white;
}
</style>
Pasting this code into the large field on the Form tab will result in the following button to appear in the preview pane when Refresh or Save are selected:
Save the button design, then on the Details tab, ensure that the Component (Make this form available for use in the Form Designer) tick box is selected and saved. This will ensure that the button appears in the Component column on the drag and drop dashboard designer:
Special Forms within Dashboards
There are certain Forms that have hard coded behaviour that is determined by their name. These are listed below with an explanation of the naming convention.
- Nav:Dashboard – A sidebar that sits to the left of the Dashboard
- Nav:Dashboard_<Role> – A sidebar that sits to the left of the Dashboard and is responsive to the role of the login
- Nav:Summary – A sidebar that sits to the left of the ticket summary screen just for the default folder(0)
- Nav:Summary(n) – A sidebar that sits to the left of the ticket summary screen for folder number (n)
- Nav:Summary_<Role> – A sidebar that sits to the left of the ticket summary screen just for the default folder and is responsive to the role of the login
- Nav:Summary_<Role>(n) – A sidebar that sits to the left of the ticket summary screen for folder number (n) and is responsive to the role of the login
Still haven’t found what you’re looking for? Contact documentation@houseonthehill.com


