These steps also need to be performed on each client machine that requires connection to HotH via the Windows UI.
Note: The instructions on how to setup the database connection for the WebServer is the same as setting up the Windows client. If you are using both the Windows client and the WebServer, then the DSN must be same.
Make sure you follow the steps for your appropriate database schema.
Microsoft SQL Server & SQL Server Express
- Go to Control Panel on the computer, and choose Administrative Tools.
- Open up Data Sources (ODBC) (If you have a 64-bit client machine then you need to use the 32-bit ODBC. Use the “Run” dialog box, and type %SystemRoot%SysWow64odbcad32.exe).
- Make sure you have the System DSN tab selected, and click Add…
- The Create New Data Source window appears, select SQL Server from the list of names, and then click Finish.
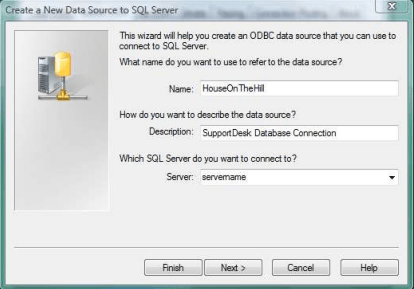
- The Create a New Data Source to SQL Server dialogue appears. Give the DSN the name HouseOnTheHill, and enter the description and name of the SQL Server to connect to. An example is given below.

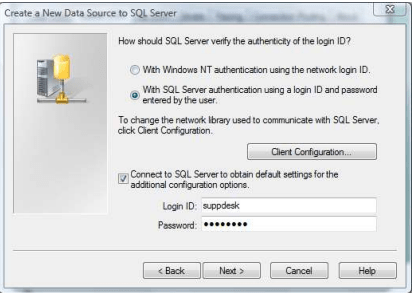
- Click Next to move on to the Authentication settings. Make sure you set up the DSN to connect “With SQL Server authentication…”. At the bottom of the window, enter your HotH SQL Server login and password. These are not stored, but are used to confirm that this DSN can connect to SQL Server correctly. An example screenshot is below.

- The next two steps of the Wizard require no changes to be made. When you get to the end of the wizard, you will be prompted to test the connection. If it succeeds, finish the Wizard and close down the Data Source Administrator. If the tests failed, double check the settings on the DSN and ensure that the specified SQL Server is available and open to connections.
- You can now log in to HotH. You may be presented with an error when you first log in – this is because HotH does not have the HotH SQL Server username and password yet. Click through the error, switch to the “SQL Settings” tab and enter the SQL Server username and password. You can then log in to HotH!
MySQL
You must download and install the 32-bit MySQL Connector/ODBC on each client machine which requires access to the Windows UI of HotH (N.B. this step is not required where client machines will only be using the WebServer). The 32-bit MySQL Connector/ODBC can be downloaded from https://dev.mysql.com/downloads/connector/odbc/.
Once installed, you need to create an ODBC connection to the database using the 32-bit Data Sources (ODBC) program in Administrative Tools (on 64-bit machines you will find this program in %systemroot%syswow64odbcad32.exe).
- Open ODBC Data Source Administrator (32-bit) program.
- Click on the System DSN tab and click Add.
- The Create New Data Source window appears, select MySQL ODBC x.y Unicode Driver as the driver (where x.y represents the downloaded version of MySQL ODBC Connector). Click Finish.
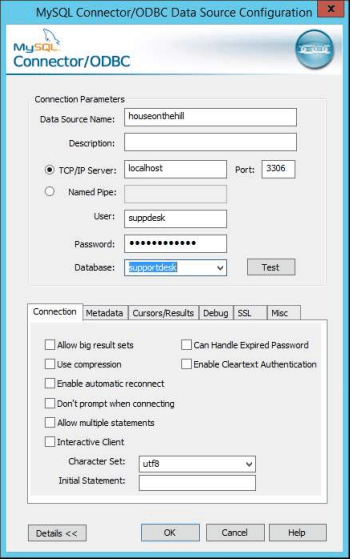
- Complete the fields as per the screenshot below, namely: Data Source Name, TCP/IP Server (MySQL server), User, Password, click on the Database drop-down and select the supportdesk schema we created earlier, click on the Details >> button to expand the bottom section and select Character Set = utf8mb4 (or utf8 in older versions of MySQL).

- Click the Test button
- Assuming the test is successful, click the OK button.
- You can now log in to HotH. You may be presented with an error when you first log in – this is because HotH does not have the MySQL username and password yet. Click through the error, switch to the SQL Settings tab and enter the MySQL username and password. Click back to the Login Details tab, and log in to HotH. The first person to log in will be assigned Supervisor privilege and a HotH login record will be automatically created using the login credentials you entered.
Still haven’t found what you’re looking for? Contact documentation@houseonthehill.com


